¶ ARandR :: Video display management
¶ Overview of display management with ARandR
The ARandR application allows you to enable or disable specific video outputs to control the available video destinations in the Scenic software, as well as the overall video resolution Scenic refers to. For example, if only one video screen is enabled in ARandR, the Scenic software will offer only one output among its video destinations, and the maximum size you can map your video to will be limited to that single screen.
If you connect a second video output and enable it in ARandR, the Scenic software can offer that second output as a possible video destination and allow you to expand or move your video across a new resolution composed of both screens. Although Scenic is not dedicated to video mapping, managing video displays via ARandR can offer an interesting creative space depending on your installation.
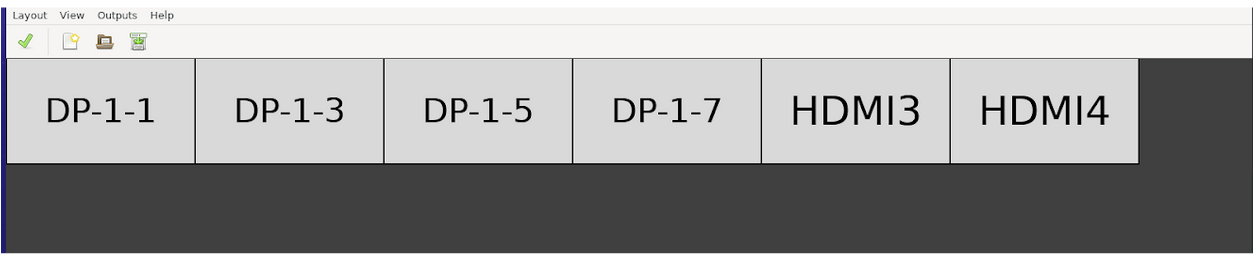
Let’s explore these possibilities with two examples. For explanation purposes, assume all outputs in the following examples have a resolution of 1920x1080 pixels. Consider the figure below, where ARandR displays six enabled outputs aligned in a single row. In this scenario, Scenic will have six different output paths to select, and the total resolution recognized by Scenic for video mapping would be the sum of the widths of all aligned screens multiplied by the height of a single screen. The full resolution recognized by Scenic would then be 11520x1080, also expressed as (1920 x 6 outputs) x 1080.
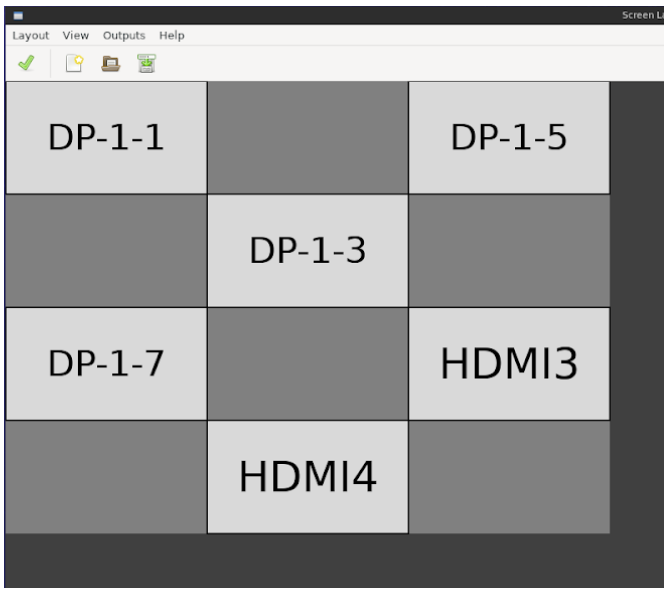
Now consider the figure below, where six video outputs are also enabled but arranged in a more complex configuration. Scenic would still recognize six possible output paths and list them among the video destination options. However, in this scenario, the mapping surface would be 5760x3240 pixels, also noted as [1920 x 3 outputs] x [1080 x 3 outputs]. This configuration may be interesting if you have a complex video installation and want to extend a video across all outputs. Such an installation can be achieved by sending your video to DP-1-1 and stretching it using the X and Y configuration settings to cover 5760x3240 pixels. Note that you would lose content located between screens, because the dark gray areas in the figure are included in the total display surface but have no output/representation area.
¶ Using ARandR
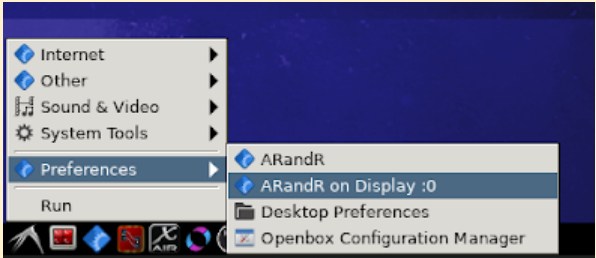
In the Scenic desktop environment, under Menu/Preferences/, you will find two ARandR options:
-
ARandR :: Use this when you control the station directly with a keyboard, mouse, and monitor connected to the Scenic station.
-
ARandR on Display :0 :: Use this when you control the station remotely, without a screen, via the web-accessible desktop environment.
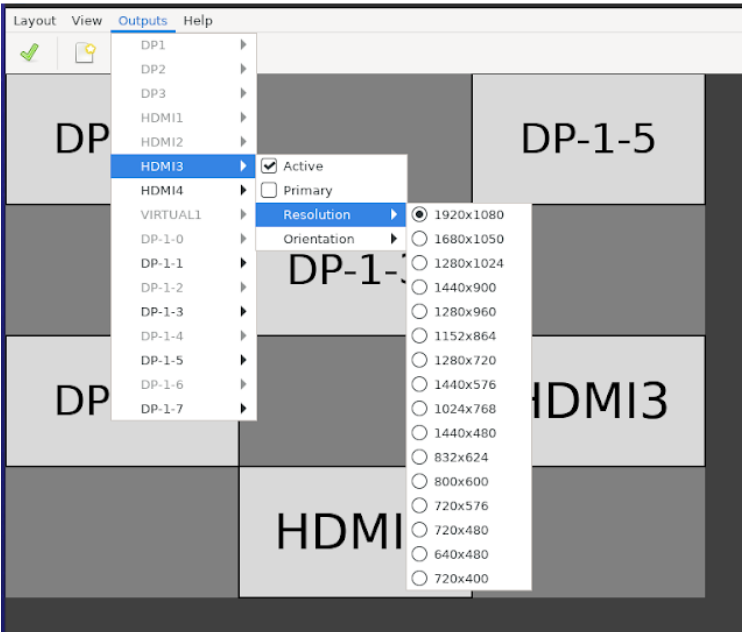
If your video outputs were connected before the station started, they should be automatically enabled and available in ARandR, as well as in Scenic’s video destinations. If you connected a video output after the station started, you will need to manually enable the corresponding software output via ARandR. In that case, open the appropriate ARandR version for your setup (“ARandR” or “ARandR on Display :0”), click Outputs in the menu bar, and the available video outputs should appear in bold. Enable the Active option, and it will appear in the upper-left corner of the ARandR display manager. Click and drag the new screen icon to the desired location in your display matrix, then, when everything is ready, click the green checkmark in the top-left.
You can also manage the resolution of any output device via Outputs/“Device Name”/Resolution/.